So, your seeds have popped, and now you’ve got a tray full of tiny green sprouts reaching for the light. Nice work. The big question now is, when do you move them into a bigger pot? The sweet spot is usually two to three weeks after they sprout, once they’ve pushed out a few sets of real, serrated leaves.
Knowing When to Move Your Cannabis Seedlings
Figuring out the perfect moment to transplant your cannabis seedlings can feel a little nerve wracking, but it’s really just about learning to read the signs your plants are giving you.
Think of it this way: your seedling is living in a tiny studio apartment. It’s perfect at first, but it won’t be long before it needs more space to stretch out and grow. Moving it too soon can shock the plant, but waiting too long will leave it cramped and slow down its growth. Nailing this timing is one of the first big wins for any grower.
Look at the Leaves
The most obvious clue is leaf development. Your seedling’s very first set of leaves are the cotyledons. They’re small, rounded, and don’t look anything like the classic cannabis leaves you’re expecting. Think of them as the plant’s packed lunch, providing just enough energy to get started.
What you’re really waiting for are the “true leaves”, the serrated, iconic looking ones. Once your seedling has at least two to three sets of these true leaves, it’s a strong signal that the plant is mature enough to handle a move. These leaves mean it’s actively photosynthesizing and building the energy it needs to bounce back from the stress of being repotted.
Check on the Roots
What’s happening below the soil is just as important as what you see up top. A healthy, expanding root system is the engine that drives a thriving plant. If you’re using a small starter pot or a solo cup, you can gently peek at the drainage holes on the bottom.
Seeing a few healthy, white roots starting to poke out is a great sign. It means the root ball is developed enough to hold its shape when you move it. You don’t want to wait until the roots are circling the bottom of the pot and becoming a tangled mess. That’s a condition called being “root bound,” and it can seriously stunt your plant’s growth.
The goal is to transplant when the roots have filled their current container but before they start choking each other out. A solid, well formed root ball that holds the soil together is exactly what you’re looking for.
Consider the Overall Vibe
Sometimes, you just have to look at the plant’s general health and sturdiness. Does the stem look thick and strong enough to support itself? Is the plant a vibrant green, or does it look a little pale and sad? A healthy seedling that’s ready for a new home will look vigorous and eager to grow.
Generally, you’ll be transplanting somewhere between 2 to 3 weeks after germination, right when those first few sets of true leaves have appeared. At this stage, seedlings are often outgrowing their starter pots and just starting to show roots at the drainage holes. Waiting too long risks the roots becoming tangled and root bound, which can stunt growth and require a longer, sometimes damaging, recovery period. For more details on this early stage, you can check out our guide on how to start your cannabis seeds indoors. An early transplant encourages a robust root system and vigorous overall growth.
Here’s a quick reference guide to help you spot the key signs that it’s time to give your cannabis seedling a new home.
Quick Checklist: Is Your Seedling Ready For A New Pot?
| The Sign | What to Look For | Why It Matters |
|---|---|---|
| Leaf Count | At least 2-3 sets of true, serrated leaves (not the first round cotyledon leaves). | Indicates the plant is mature enough and photosynthesizing well to handle the stress of a move. |
| Root Development | White, healthy roots are visible at the drainage holes but are not heavily tangled or circling. | Shows the root system is established enough to hold the soil together but not yet root bound. |
| Plant Size | The seedling’s height is about two to three times the width of its current container. | A good rule of thumb that suggests the plant is starting to outgrow its current home. |
| Overall Health | The stem is sturdy, and the leaves are a healthy, vibrant green color. | A strong plant will recover from transplant shock much faster than a weak or struggling one. |
Once you see a few of these signs line up, you can be confident that your seedling is ready for the next step. Don’t overthink it. Trust what your plants are telling you.
The Art of a Stress Free Transplant
Okay, you’ve read the signs, and it’s officially time to give your seedlings more room to grow. The big goal here is to make the move as smooth as possible. Think of it like moving a fish from a small bag to a big tank. You want to be quick, gentle, and cause the least amount of drama.
A stress free transplant is the secret to unlocking explosive growth in the plant’s new home. The whole process can feel a little intimidating the first time, but it’s actually pretty straightforward once you get the hang of it. It’s all about having your gear ready and your technique dialed in. A little prep work goes a long way in preventing transplant shock, which is basically your plant freaking out from the move.
Setting the Scene for Success
Before you even touch your plant, get its new home ready to go. This means filling your larger pot with your chosen growing medium, leaving just enough space for the seedling’s root ball. Go ahead and make a hole in the center of the new soil that’s about the same size as the starter pot.
Here’s a huge pro tip: water your seedling a day or two before the transplant. This simple step helps the soil cling to the roots, making the root ball solid and way easier to handle. Trust me, trying to transplant dry, crumbly soil is a recipe for disaster and snapped roots.
This flow chart breaks down the main cues we covered for knowing when it’s time to move your cannabis seedlings.
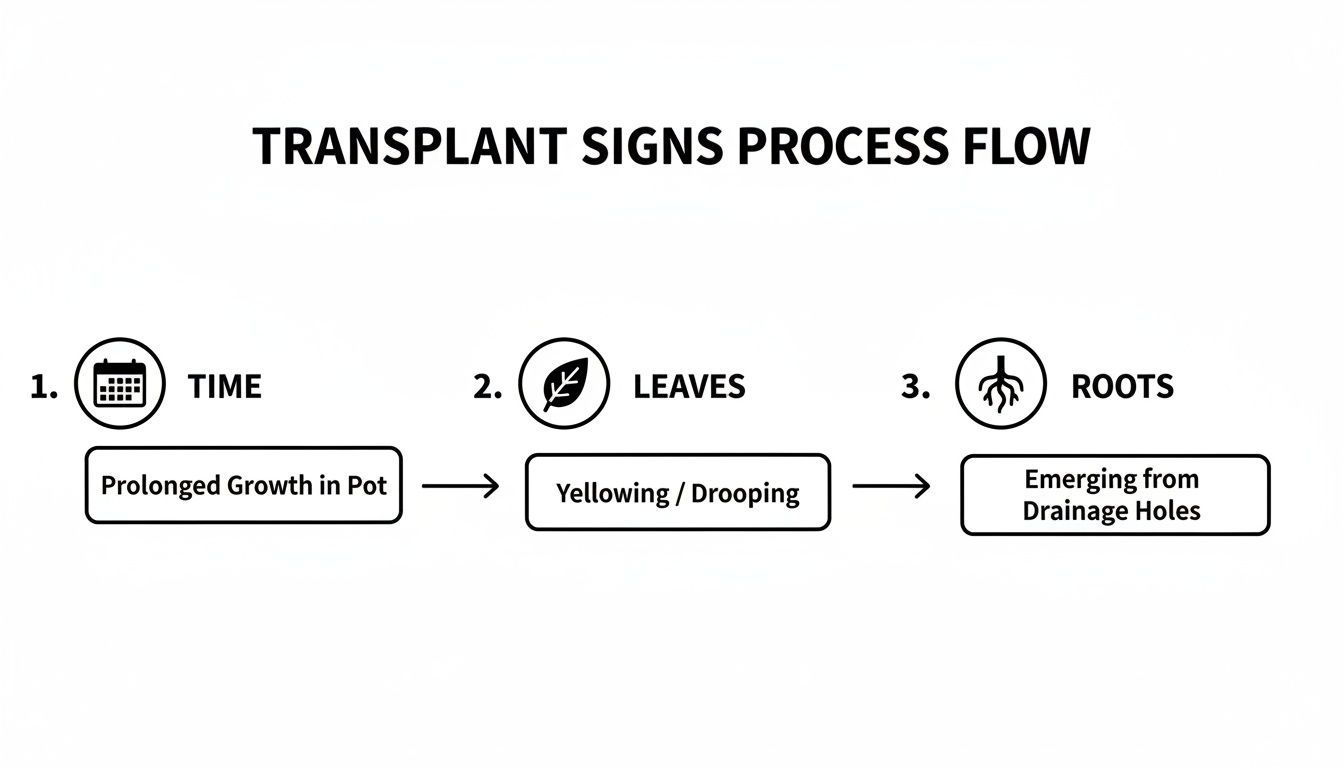
It’s a great visual reminder to check the plant’s age, leaf development, and root growth before making a move.
Making the Move Smooth and Gentle
When it’s go time, remember this one critical rule: never pull the plant by its stem. The stem is incredibly fragile and easy to damage.
Instead, turn the starter pot upside down while supporting the top of the soil with your hand, letting the seedling rest gently between your fingers. A light squeeze or a few taps on the bottom of the pot should be all it takes for the whole thing to slide out cleanly. If it’s being a little stubborn, you can run a butter knife around the inside edge of the pot to loosen things up.
Once it’s out, you’ll see that nice, contained root ball. Place it directly into the hole you already prepared in the new pot.
The key to avoiding transplant shock is minimizing the time the roots are exposed to open air. Have everything prepped and ready so you can move the plant from its old home to its new one in seconds.
Fill in any gaps around the root ball with more soil, gently patting it down to eliminate air pockets. Don’t pack it down too hard; you want the roots to have room to breathe and expand. Finish it off with a light watering to help the soil settle and welcome your plant to its new digs.
Choosing the Best Time of Day
Believe it or not, when you transplant matters. The best time is in the evening or on a cloudy day. Bright, intense light is just added stress for a plant that’s already dealing with a move.
Transplanting during a cooler, darker period gives the plant several hours to recover and settle in before it has to handle the energy demands of intense light. For indoor growers, this means doing the transplant right before the lights go out for their “night” cycle. It’s a simple trick that can make a huge difference in how quickly your seedling bounces back.
Once the transplant is done, you’re not quite finished. Aftercare is just as important, but for now, let’s recap the essential steps for a clean transplant.
Your Stress Free Transplant Checklist
- Prepare the New Pot: Fill the larger pot with your medium and dig a hole for the seedling ahead of time.
- Water in Advance: Water the seedling 1-2 days before you transplant to help the root ball hold its shape.
- Be Gentle: Never, ever pull the stem. Let gravity do the work by turning the pot upside down.
- Move Quickly: Get the plant from its old home to its new one in seconds to minimize root exposure to air.
- Settle It In: Backfill any gaps with soil, pat it down gently, and give it a light watering.
- Time It Right: Transplant in the evening or just before your indoor lights turn off to reduce stress.
By following these steps, you’ll give your young plants the best possible start in their new homes, ensuring they don’t miss a beat on their journey to becoming healthy, productive giants.
Choosing the Right Pots For Happy Roots
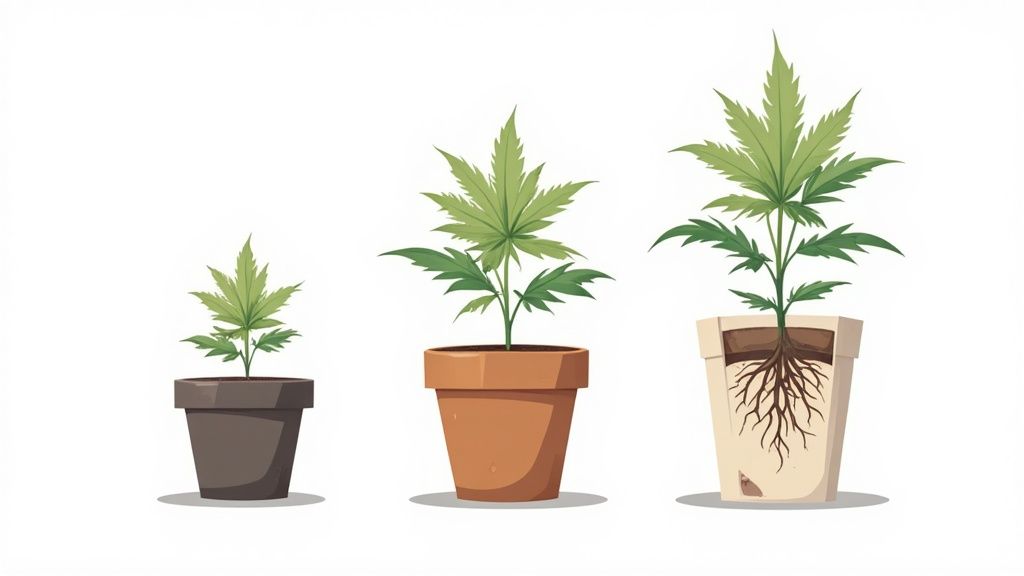
Alright, let’s talk about real estate for your plants. The pot you choose is way more than just a bucket of dirt; it’s your plant’s home, and picking the right one is a huge deal for keeping its roots happy and healthy. This whole section is about getting your pot sizing strategy right from the start.
You wouldn’t put a baby in a king sized bed, right? Same logic applies here. Starting seedlings in a massive pot is a common rookie mistake that often leads to overwatering and sad, droopy plants. That’s why most experienced growers “pot up”, a simple term for starting small and moving to progressively larger containers as the plant grows.
This method gives you way more control over watering and encourages a dense, healthy root system. When a tiny plant sits in a huge pot, the soil stays wet for too long because the small roots can’t possibly drink all that water. Potting up solves this problem neatly.
Pot Types: Fabric vs. Plastic
When you’re shopping for pots, you’ll mainly see two options: classic plastic pots and the newer fabric “smart” pots. Both get the job done, but they work quite differently.
- Plastic Pots: These are the old school standard. They’re cheap, reusable, and great at retaining moisture. The downside is they don’t offer much airflow to the roots. If you’re not careful, plants can become root bound, with their roots circling the bottom of the pot in a tangled mess.
- Fabric Pots: These are basically pots made of a thick, breathable fabric, and their biggest advantage is something called “air pruning.” When a root reaches the fabric wall and hits the air, it naturally stops growing that way and branches out, creating a much healthier, more fibrous root ball. They also make it almost impossible to overwater since excess moisture just weeps right through the material.
Honestly, fabric pots are a game changer, especially for new growers. They take a lot of the guesswork out of watering and promote awesome root health.
Sizing Up Your Pots
So, what size pots should you actually use? It really depends on your setup, but here’s a common progression that works well for the feminized photoperiod cultivars we sell.
Indoor growers usually transplant once or twice before flipping to flower, while outdoor growers might do it a few more times to get their plants huge. A typical path starts with germinated seeds in a small cup (around 0.2–0.4 liters), moves to a 1 gallon pot (about 3.5 liters) for vegging, and finally into a 3 or 5 gallon pot (11-19 liters) for flowering.
It’s crucial to never transplant after the flowering stage begins. The stress can mess up your plant’s development and seriously hurt your final yield.
A good rule of thumb is to transplant when the plant’s leaves reach the outer edges of its current pot. This is usually a solid sign that the roots have filled out the space below.
No matter what pot you choose, good drainage is non negotiable. If your pot doesn’t have holes in the bottom, you need to add them. Without proper drainage, water will pool, starving the roots of oxygen and leading to root rot, a quick way to kill your plant.
Ultimately, your pot choice sets the foundation for your plant’s entire life. And the pot you use is directly connected to the growing medium you fill it with. Getting both the container and the soil right is key to building a root system that can support a massive, healthy plant.
Special Rules For Autoflower Cultivars

Autoflowers are fantastic, but they march to the beat of their own drum. They play by a different set of rules, and this is especially true when it comes to transplanting. Since we’re all about top shelf autoflower and feminized seeds here, getting this right is a big deal.
Unlike photoperiod plants that you can keep in their vegetative stage almost indefinitely, autoflowers operate on a fixed biological clock. From the moment that seed pops, a countdown begins. They will flip into flower after just a few weeks, and there’s nothing you can do to stop it. This means they have absolutely zero time to spare recovering from stress.
The No Transplant Method
Because of this rigid timeline, many growers just skip transplanting autoflowers entirely. The thinking is simple: plant your germinated seed directly into its final, large pot and let it live out its full life cycle right there. This is, without a doubt, the safest way to go.
By planting directly into the final container, you completely sidestep the risk of transplant shock. Any shock, even a minor one, can stunt an autoflower for several days. The problem is, a few days is a massive chunk of its short life, and that lost growth time can directly translate into a smaller harvest. It’s a pretty compelling argument for just letting them be.
For autoflower cultivars, less stress is always better. The “one and done” pot method is your best bet for maximizing growth and yield without any transplant related hiccups.
When You Have to Transplant Anyway
So, why would anyone ever bother transplanting an autoflower? Sometimes, you just don’t have the room to start a dozen seedlings in huge 5 gallon pots. If you’re popping a bunch of seeds at once, using small starter cups is way more practical from a space saving standpoint.
If you find yourself in this boat, you have to get the timing perfect. The window for when to transplant cannabis seedlings is much, much tighter for autos. You need to move them just as their roots have filled the starter cup but before they have a chance to become root bound. This usually happens lightning fast, often within just 7 to 14 days of sprouting.
You’re looking for the same visual cues we talked about earlier: a couple sets of true leaves and some healthy white roots poking out from the drainage holes. The second you see those signs, it’s go time. Do not wait. Any delay can cause some serious stunting.
The Science Behind the Rush
Putting off the move can have a major impact. Recent research showed that autoflowering cultivars transplanted after 15 days from starter plugs had much better root development than those moved later. When the transplant was delayed to 22 or 29 days, the plants saw a massive drop in height by up to 55% and branch number by up to 68% compared to those started in large pots. The study also found that overall plant growth and yield were slashed by 40% or more when the transplant happened after that 15 day mark. This data really hammers home how critical it is to act fast if you choose to transplant.
Here’s a quick breakdown of the pros and cons to help you decide what’s best for your grow.
| Method | Pros | Cons |
|---|---|---|
| Direct Seeding | • Zero transplant shock. • Maximizes growth potential. • Easiest and safest option. |
• Requires a lot of space from day one. • Can be tricky to water a tiny seedling in a huge pot. |
| Transplanting | • Saves space when starting multiple seeds. • Easier to manage watering for young seedlings. |
• High risk of stunting the plant if done incorrectly or too late. • The timing has to be absolutely perfect. |
Ultimately, whether you transplant or not is up to you, but understanding the unique nature of these plants is key. For most growers, especially those new to autoflowers, planting directly into the final pot is the winning strategy.
Aftercare and Troubleshooting Transplant Shock
Alright, you did it. Your seedling is in its new home. The move is done, but the job isn’t quite finished yet. That first week after a transplant is super important for helping your plant settle in and get back to growing.
Think of it like this: your plant just had a pretty big day. It needs a little time to chill and get comfortable in its new surroundings. Our job now is to make that transition as smooth as possible. This means dialing in the aftercare, from watering to lighting, and keeping an eye out for any signs of stress.
Post Transplant Care Essentials
Your plant’s needs change a bit right after being moved. It’s more sensitive, so we need to adjust our routine. Don’t just go back to business as usual.
A little babying for the next few days goes a long way. This immediate aftercare is what separates a plant that bounces back in a day from one that struggles for a week.
Post Transplant Checklist
- Watering: Give it a light, gentle watering right after the transplant to help the soil settle around the root ball. For the next few days, keep the soil consistently moist but absolutely do not overwater it. The roots are recovering and can’t handle soggy soil.
- Lighting: Dim the lights a little bit for the first day or two. If you’re growing outdoors, try to provide some partial shade. Reducing light intensity lowers the stress on the plant, giving it time to focus on root repair instead of photosynthesis.
- Feeding: Hold off on the nutrients. Do not feed your plant for at least a week after transplanting. The fresh soil has plenty of what it needs for now, and feeding a stressed plant can cause nutrient burn, making things much worse.
Spotting and Fixing Transplant Shock
Even with the most careful hands, sometimes plants get a little stressed from the move. This is called transplant shock, and it’s pretty common. The good news is that it’s usually temporary and easy to fix if you catch it early.
Don’t panic if your plant looks a little sad for a day or two. The most common signs are easy to spot.
The key is to watch your plant closely for the first 24 to 48 hours after the move. Most signs of transplant shock will show up within this window, giving you a chance to correct course before any real issues set in.
Your plant will usually perk right back up once it realizes it has a bunch of new space for its roots to explore.
Common Signs of Stress and What to Do
If you notice your plant acting up, it’s usually telling you it needs something specific. Here’s a quick guide to what those signs mean and how to respond.
Wilting or Drooping Leaves
This is the most common sign of transplant shock. It happens because the roots were temporarily disturbed and are having a tough time absorbing water.
- The Fix: Make sure the soil is moist but not waterlogged. Check your light intensity and dim it if you haven’t already. Usually, the plant will bounce back on its own within a day as the roots get re established.
Yellowing Leaves
If you see leaves turning yellow, it can be a sign of overwatering or nutrient issues.
- The Fix: Let the soil dry out a bit before watering again. Remember, no nutrients yet! The plant is in recovery mode.
Slowed or Stalled Growth
It’s normal for growth to pause for a day or two. The plant is putting all its energy into developing its root system in the new pot.
- The Fix: Just be patient. As long as the plant looks otherwise healthy, give it a few days. Once the roots get settled, you’ll see explosive new growth.
Proper aftercare is the final step in a successful transplant. By giving your plants a little extra attention, you set them up to not just survive the move but to absolutely thrive in their new, bigger home.
Got Questions About Transplanting?
We get a ton of questions about transplanting cannabis seedlings, so we figured we’d wrap this up by hitting the most common ones. Think of this as the quick fire round to clear up any lingering confusion. These are the things growers are always asking, answered straight up.
Getting these little details right can make a huge difference in your garden and give you the confidence to handle situations as they pop up. Let’s get into it.
What Happens If I Wait Too Long to Transplant
This is a super common scenario. You get busy, life happens, and suddenly your seedling has been chilling in its starter cup for way too long. When a plant outgrows its pot, its roots have nowhere to go and start circling the bottom, becoming what’s known as “root bound.”
A root bound plant is basically choking itself out. The tangled roots can’t properly absorb water or nutrients, which leads to stunted growth, yellowing leaves, and a plant that just looks sad and stalled out. If you pull the plant from its pot and see a dense, tangled mess of roots, you’ll need to gently break them up with your fingers before repotting. This encourages them to grow outward into the new soil. The plant can definitely recover, but it will set your timeline back a bit.
Can I Transplant a Flowering Plant
Short answer: please don’t. Transplanting is a stressful event for any plant, and doing it while it’s in the middle of flowering is just asking for trouble. A flowering plant is putting all its energy into producing buds, not recovering from the shock of a new home.
Moving a plant during its flowering stage can cause so much stress that it might stall bud production entirely. In a worst case scenario, it could even trigger the plant to become a hermaphrodite. It’s just not worth the risk.
Get all your transplanting done during the vegetative stage, well before you see the first signs of flowers. The only exception is an absolute emergency, like a broken pot, but even then, you should expect some kind of negative impact on your final harvest.
How Many Times Should I Transplant
The number of times you transplant really depends on your growing style and the kind of cultivars you’re running. There isn’t a single right answer, but here are some general guidelines that work for most home growers.
- For Feminized Photoperiod Plants: A common path is to transplant two times. You might start in a solo cup, move to a 1 gallon pot for veg, and then up pot into a final 3 or 5 gallon container for flowering.
- For Autoflower Cultivars: As we covered earlier, the best practice is to transplant zero times. Planting your germinated seed directly into its final pot is the safest bet to avoid stunting its short life. If you absolutely have to, do it only once, and do it very early.
Each transplant is an opportunity for the roots to expand into fresh soil, but it’s also a moment of stress. The goal is to find a balance that works for your space and your plants, giving them enough room to thrive without putting them through any unnecessary shocks.
Ready to start your next grow with seeds you can trust? Pacific Seed Bank has over 1,400+ premium feminized and autoflowering cultivars, all lab tested and backed by a germination guarantee. Find your perfect strain and get growing today.


